Manual Installation
The steps below are the typical, manual, deployment/installation steps followed to host the web application in a Windows environment (on IIS).
Note: If you are updating the application, see the Updating Application section below.
The install package will contain a directory named “tds”, this is the primary deployment folder that will be used in the following steps.
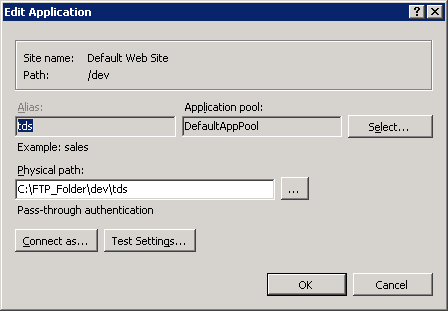
Create “tds” Application
Create a new application in IIS Manager called “tds” and point the “Physical path” to the “tds” directory that you copied/created in the previous step.
Note: If you copied the tds directory directly to “C:\inetpub\wwwroot” then you only need to right click on the “tds” folder in IIS Manager and click Convert to Application.
Use the “DefaultAppPool” if the default application pool is .NET 4.5 - if not you will need to create an app pool for .NET 4.5 and set that as the app pool for this application. After installing .NET 4.5 the default app pool should automatically be configured to use .NET 4.5.

After the application is deployed, follow the remainder of the installation steps in the Getting Started section.
If the application has already been deployed and you are trying to re-deploy a newer version of the application, manually, the following steps should be taken:
- Extract deployment package.
- Make a backup of the current application (tds directory).
- Overwrite all of the content currently deployed (in IIS) with the contents of the "tds" directory in the deployment package.
- Update the web.config to match your previous deployment configuration/settings.
- Run the application and test.
